General Variable Contrast photographic paper & LED Information
Variable Contrast or Multigrade photographic papers are able to produce contrast grades between Grade #00 (softest) and grade # 5 (hardest) through being coated with different emulsions. See the Ilford Harman Technical Information on Contrast Control. “MULTIGRADE papers are coated with an emulsion which is a mixture of three separate emulsions. Each emulsion is a basic blue sensitive emulsion to which is added different amounts of green sensitising dye. Thus, part of the mixed emulsion is sensitive mainly to blue light, part to blue light with some sensitivity to green light and part to both blue and green light. “ Source: Ilford.
This is why we are able to achieve different grades by using the Multigrade filters, enlarger color-heads with a mix of Yellow and Magenta, OR with Green/Blue LEDs.
Green LEDs output light with 520-535 nm wavelength and Blue 450 to 470nm wavelength, lower is better (Royal blue). The paper is safe to light from 550 nm and above, the Red LEDs are from 620 to 630 nm wavelength and thus safelight.
LEDs are still a fairly new technology, thus expect better LEDs ahead of us, brighter and more power efficent etc. Thus keep current with the latest technology, i.e. don’t buy 2000 technology LEDs in 2019 🙂
As said in the introduction, I did some google-fu and found me plenty of excellent DIY LED head sources on the web, the two first are the main inspiration:
- GTripping Through the Dark – LED Head by Larry
- JBH Photo – Designing & Building an LED VC Enlarger head (pdf)
- The holy grail (and at a cost) of LED heads from Heiland Electronic and
- more..
Its also worth noting that the are a increasing numbers of DIY f-stop timer projects out there, Great stuff!! as it ensures that the gospel on f-stop printing is getting more publicity!
Now how to properly light a LED?
This may quickly becomes in depth electronics, but the short version is that high power LEDs needs a constant current and minimum the voltage as the LEDs the forward voltage pr LED dictates. Here are some more information
-
–Meanwell ldd-xxxh LED driver (as used in my projects)
Thus you get grade 0 when sending current in the GREEN LED, and grade 5 when doing the same with the BLUE LED. Perfect for Split grade printing.. !
Now what if we want grade 2.5 ?? or grade 4?? Then we need to switch on(off) BOTH LEDs and vary the intensity of each with Pulse Width Modulation (PWM) in order to achieve different mixing ratios. PWM is the duty cycle / ratio between ON/OFF of the current through the LED, remember the constant current mentioned above?

And now HOW do determine which PWM mix of green and blue provides the different grades??
As a start you need to get hold of a Stouffer transmission Test wedge and a copy of the Variable Contrast Manual. I was lucky and have on loan the step wedge from a friend and found a copy of the VC printing manual on ebay.
Using that, i.e. interpreting the Stouffer step wedges results at the various green/blue mix, the I was able to tweak the PWM mix of green and blue to to achieve the grades from 00 to 5 (almost 5) using Ilford Multigrade pearl on the Focomat IIc set up, however its not (yet) calibrated for even exposure time between the grades. That scale I made from thus is used for the grades in the timer. And just to mess this up further the exercise needs to be done for each different paper type, thus you need to select the adjusted grade scale for each paper.. :-
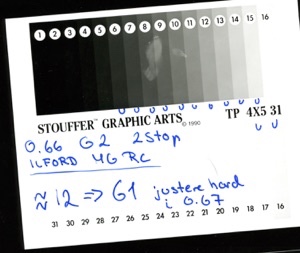

Some of my contact copied Stouffer Step Wedges at various grades, to adjust my mix of green and blue light to achieve the various grades. The achieved grade is determined by counting the number of standalone wedges or bars i.e. not totally black nor white. And then using the number of wedges towards table 3.2 in the variable contrast manual to establish the ISO, and then using the ISO number towards figure 3.1 to find the achieved grade. See my cheat sheet below.

NO YOU DON´T NEED TO CALIBRATE EACH PAPER! But you can:-) Ever seen a photo exhibition where the print grade, times or developer was part of the presentation?? Its whats is captured on the final image with you as the artist that counts!!
NB! Evenness of illumination should be checked…
Raise the head to your largest print size, and expose a paper to a even gray tone across the paper without any negative in the enlarger. (or a smaller sheet like a 4×5 in the center and then a similar size paper in the corners) Develop the paper normally. Then examine the print in order to see if the exposure is uniform and if there are any hotspots. You could expect some fallout towards the edges, thats normal and would be there on a classic incandescent lamp head also, and is easily compensated for with by burning in the edges i.e. vignetting. However if there are hotspots check your LED locations and perhaps add more diffusion.