f Stop timer
Modes & key features:
The LED head timer offers four (five) modes of operation:
- Dual channel 7 memory slots F-Stop split grade timer mode with built in quick soft, hard teststrips, medium grade teststrip, drydown factor etc
- Dual cannel 7 memory slots Linear split grade timer mode with built in soft and hard teststrips, drydown factor etc
- Standard Linear timer mode with freely adjustable times and grades.
- External timer input mode with changeable grades to utilize the original William Brodie-Tyrrell f-stop timer or a timer like the RH Design “Stop clock” as timer input.
- Select@PowerOn Mode, i.e forces mode select on each power on.
User defined dry-down factor between 0-25%, set on/off by user. Ability to change test-strip grades, start-point and change between each test-strip step. All settings, contents of all memory slots are stored to the permanent memory, thus if you experience a power-failure or need to reset the timer your data remains safe.
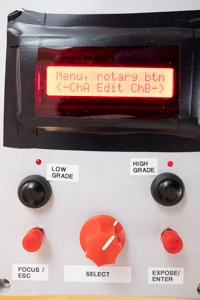
Controls:
Low Grade, High Grade push buttons, Low Grade Led, High Grade Led: these buttons and indicators are used as a quick set up of the LED head grade. Most applicable in the Linear and External modes. Currently Low grade is grade 0 and High grade is 5, the may in a later version be changeable in the settings menu if you like your split-grade between 1 and 4.
Focus / Escape push button: Use to enter the Focus state when allowed, or used to escape one level up when in a menu or during a exposure sequence that you want to abort. Focus state, press “Focus” once to enter, and the safelight will be switched off, then switching on the green, blue and the red LEDs in the enlarger head to create maximum brightness for focus, also activating the light reading sensor (copy from f/stop timer William Brodie-Tyrrell code) , further pressing “Expose” will darken the display. Pressing “Focus” once more aborts focus and returns you back to the conditions prior to pressing “Focus”.
Expose / Enter push button: Used to start the exposure sequence in f-stop mode and to start the exposure with the current grade in the Linear modes. Not used when in External timer mode. In menus pressing the Expose / Enter push button confirms the selection.
Select Rotary & push button: This is used to adjust values, confirming the new value with a press. Also used to navigate and select in menus.
All user settings are stored to permanent memory thus should power fail or you need to reset the timer, the same settings will be there on power on.
Mode changes: Hold down Focus button during power on, and selected desired mode with the rotary knob and press the rotary button. The Timer remains in that mode until the selected process i.e. Pressing Focus during power is repeated.
Clear the Split grade memory slots: Press down and hold Expose Button during power on.
“Factory Reset”: to clear all settings, memory channels etc back to the initial configuration press and hold Rotary button during power on.
f-stop timer mode:
In f-stop timer mode the start-up and main display looks like this:
F-Stop Mode
<- ChA Menu ChB->
Rotating left gives you the Channel A sequence of exposure steps, right rotating gives you the Channel B sequence of exposure steps. Pressing the rotary button in the main display takes you to the menu. Note that the “Focus” and “Expose” buttons are only active when in the main display view, in all other settings they act as escape and enter keys.
A single exposure step in a channel may look like this:
-A0 Base Exp
G: 0.0 S: 2.00
or
-Ax Step: x
G: 0.0 S: 1.25
A0, is the exposure id. i.e. A0 to A6 and B0 to B6
G = Grade
S = f stops above or below the base exposure (e.g. burn or dodge)
Pressing the rotary button will allow you to change both grade and f-stops. Once done you may rotate back to the main display view.
Menus in f-stop timer mode available from the main display view by pressing the rotary button. Escape from menu pressing Focus/Escape button.
<Soft Quickstrip
*0.0/ 1.00+ 0.50
Is a preprogramed test-strip for the soft exposure in split grade. Settings is Grade 0, base exposure 1 step and increments of 0.50 step. The “*” indicates / reminds you that it will use the settings in the B0 exposure slot (i.e. channel B base exposure) as the hard base exposure.
<Hard Quickstrip
*5.0/ 1.00+ 0.50
Is a preprogramed test-strip for the hard exposure in split grade. Settings is Grade 5, base exposure 1 step and increments of 0.50 step. The “*” indicates / reminds you that it will use the settings in the A0 exposure slot (i.e. channel A base exposure) as the soft base exposure.
<Medium Quickstrip
2.5/ 1.00+ 0.50
Is a preprogramed test-strip for a medium grade exposure, used to establish a quick overall view of the negative. Settings is Grade 2.5, base exposure 1 step and increments of 0.50 step.
<-Press to change
TstStrBase: 1.00
Allows you to change base exposure setting used in the Quickstrips. Displays the current setting.
<-Press to change
TstStr Stp: 0.50
Allows you to change test strip intervall setting used in the Quickstrips.Displays the current setting. Stops in in F-Stop mode, Seconds in Linear Mode.
<-Press to change
Hard Grade: 5.00
Allows you to change Hard Grade setting used in the Hard Quickstrip.
<-Press to change
Soft Grade: 0.00
Allows you to change Softgrade setting used in the Soft Quickstrips.
<-Press to change
Drydown: On/Off
Displays if the Drydown % factor is used to adjust the exposure times or not. Toggled on/off by pressing the rotary button.
<-Press to change
Drydown%: 10
Displays the drydown factor, allows it to be adjusted by pressing the rotary button. Will subtract the set % from the exposure time, when Drydown is On.
<-Press to change
Auto Expo: On/Off
Displays if the state of the auto expose flag. When On the timer automatically jumps from one step to the next in the exposure sequence or test-strip. Very handy.Toggled on/off by pressing the rotary button.
Focus push button: see above
Focus
xx.yy stops
Expose push button: starts the exposure sequence, by calculating the exposure time for each step in the two channels based on base exposure, burn and dodge values. If the sum of the dodge values are more than the base exposure the exposure sequence is aborted . The basic f-stop mode exposure display:
EXP, ChA, Sn Base (Dodge or Burn)
G: 0.0 T: 4.0(D)
ChA or ChB,
Sn is the step in that Channel from 0 to 6.
G = grade, T= time in seconds
D = Drydown factor active or not. Will subtract the set % from the exposure time.
Linear Memory timer Mode:
In Linear timer mode the start-up and main display looks like this:
Linear Mode
<- ChA Menu ChB->
Functions are exactly similar to F-Stop, except that steps (S:) has been replaced by time (T:). Dodges as minus exposure naturally not accessible.
Linear timer mode:
In Linear timer mode the start-up and main display looks like this:
Linear Timer
G: 3.0 Time> 6.0
G = grade, adjust by pushing rotary,
Time in seconds.
The > indicates if its grade or time which is adjusted with the rotary knob.
Low Grade, High Grade push buttons: are use as a quick set of the LED head grade. Want to change the settings of High and low? e.g. Grade 4 and Grade 1, then change mode to Linear Memory mode or F-stop mode and change the values in the menu.
Focus push button: press “Focus” once to enter focus, and the safelight will be switched off, the selected Focus light will be switched on. i.e. Red to White or straight to white focus light. See settings menu.
Expose push button: starts the exposure at the set grade and time. The basic Linear mode exposure display:
Expose (DRY)
G: 0.0 T: 4.0
Will start automatic if Auto expose flag is ON. DRY indicates that drydown is active. Change mode to Linear Memory mode or F-stop mode and change the values in the menu if required, i.e. Auto Expose on/off, Drydown on/off, drydown %.
External timer mode:
In External timer mode the start-up and main display looks like this:
External Timer
G: 3.0 OFF/ON
G = grade, adjusted with rotary,
When the input is triggered the state changes to ON.
Low Grade, High Grade push buttons: are use as a quick set of the LED head grade.
Focus push button: press “Focus” once to enter focus, and the safelight will be switched off, the red LEDs in the enlarger head turned on, further pressing the “Expose” button will switch on the green, blue and the red LEDs in the enlarger head to create maximum brightness for focus. Pressing “Focus” once more aborts foces and returns you back to the conditions prior to pressing “Focus”.