Firmware
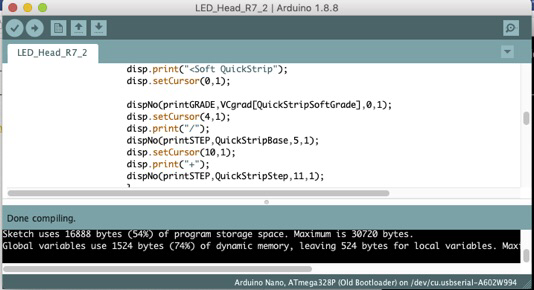
The Arduino Sketch (i.e. C like source code) is fairly straight forward, however I could have used more procedures in order to be more efficient and to clean up the code. Now there are several almost similar sections of codes in there, and most of that could have be done smarter 🙂 Thus if space becomes tight thats an area to look to..
Also a key element to note is that the rotary-encoder is read using interrupts, if you read the code and ask yourself how it changes value.
Current version (February 2019 is Rev 0.89)
Please send me an email (adress below) if you would like a copy the latest codebase. The code is fully open source, please feel free to hack at will!
Email : morten at kolve dot org
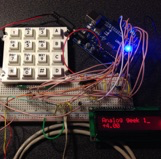
Hardware

Hardware is very straight forward and uses easily sourced components. Given my location in Norway, eBay is a good source when you not are in hurry. The power LEDs in the LED Head needs to be mounted on some form of heatsink as you will be dissipating some heat! Not much compared to a incandescent light bulb set up, which could be 2 x 300W, but quickly in the 10-30 W area, thus cooling is smart!. Also note that the power LEDs Controls need PWM input, i.e. need to be on the Arduino PWM capable pins.
I have up to now used the same electronics for two LED Heads / Enlargers (Durst 138 and Focomat IIc), just switch cable between the two heads and the PWM drivers.
Simplified bill-of-materials below.
I have used Circuit Design as my design tool, recommended with no affiliation what so ever.
Link to the public design of the LED Head Hardware.
Parts needed: (the links are just the first hit on eBay, pick any one you like)
- Arduino Nano, any similarly capable Arduino would do, I just had a Nano around 🙂 Ebay link
- 16×2 LCD I2C with Red backlight, Like this Ebay link Also note as this is a I2C connected display I have yet to find a way to dim the backlight other than turning it off, thus I have covered the display with some sheets of Ruby light filter to dim it down a bit.
- 4 x 1 k resistor, Ebay link
- 1 x Rotary encoder, Ebay link
- 2 x 3mm red LED, Ebay link
- n x Meanwell LED Driver eg for 500mA use Ldd-h500H, Ebay link
- Note yo may also get the the meanwell LED drivers premounted on a PCB
- FET Board (or a Meanwell LED Driver if you get the meanwell PCB) to switch on/off of the Safelight LEDs during focus, Ebay link
- POWER LEDS:
- Green & Blue (look for Royal Blue or even shorter wavelength towards IR)
- RGBW w PCB
- 5v power to the Arduino or a USB powerplug.
- 24VDC PSU minimum Watt is number of LED drivers current + safety margin, no need to be cheap on this.. eg 3 x Ldd-500H => 3 x .5 x 24 + safety => 50-100W to be on the safe side.
PS USE A 240AC PSU AT OWN RISK!!! CHECK LOCAL REGULATIONS
I currently use a old laptop PSU which provides 20V DC and up to 3Amps, works OK for 5 1W LED connected in series.